





Replace your brake pads now if they measure 2 millimeters or less, and plan replacement soon once they hit about 3 millimeters, or 1/8 inch, as recommended in this mechanic checklist and DIY guidance. Federal inspection standards set a legal floor of 1/32 inch of lining over the fasteners, but that number assumes a perfect, even measurement. Any grinding noise, a soft or sinking pedal, or visible rotor damage overrides every number here: stop driving and get your brakes checked immediately.
TL;DR:
- Brake pads should be replaced at 3 millimeters or less to provide a safety margin before damage occurs to rotors.
- The legal inspection minimum is 1/32 inch (about 0.8 millimeters), but driving at this thickness risks safety and rotor damage.
- Measure friction material only, on both inner and outer pads, to avoid missing uneven wear that can cause noise or reduced braking.
- Symptoms such as grinding noise, soft pedal, or vibration require immediate inspection, regardless of pad thickness measurements.
- A full brake inspection includes checking pad and rotor thickness, caliper function, and overall system condition to ensure safe stopping performance.
Table of Contents
- What inspection standards say about minimum pad thickness
- Practical thresholds you can actually use
- How to measure brake pad thickness accurately at home
- Symptoms that mean your brakes need attention now
- Why rotor condition changes the replacement decision
- When to bring your brakes to a professional
- Our take: measure first, then let symptoms make the call
- Book a brake inspection at Kwik Kar White Settlement
- FAQ
- Sources
What inspection standards say about minimum pad thickness
Federal vehicle inspection rules give us the legal floor for brake pad thickness, and it is thinner than most drivers expect. Under 49 CFR Part 570, disc brake pad lining must measure at least one-thirty-second of an inch over the rivet heads or other fasteners holding the friction material to the backing plate. That works out to roughly 0.8 millimeters, which is barely enough material to call a pad at all.
Inspectors are instructed to measure the thinnest point of the lining, not an average or the thickest remaining section. A pad can look fine from one angle and still fail inspection if one corner has worn down to bare metal. The same inspection standard also requires checking rotor or drum condition against the manufacturer’s embossed minimum thickness, which matters because pads and rotors wear as a system, not separately.
It helps to separate two different numbers that often get confused:
- Legal inspection minimum: 1/32 inch over the fastener, the lowest thickness that passes a standard safety inspection.
- Manufacturer service limit: the thickness your vehicle maker recommends for replacement, usually higher than the legal minimum and listed in your owner’s manual or service specs.
- Practical replacement threshold: the point mechanics and organizations like AAA recommend acting on, intentionally built with a safety margin above the legal floor.
The gap between these numbers is the point. A pad can be legal and still be a bad idea to keep driving on, which is why we treat the regulatory minimum as a backstop, not a target.
Practical thresholds you can actually use
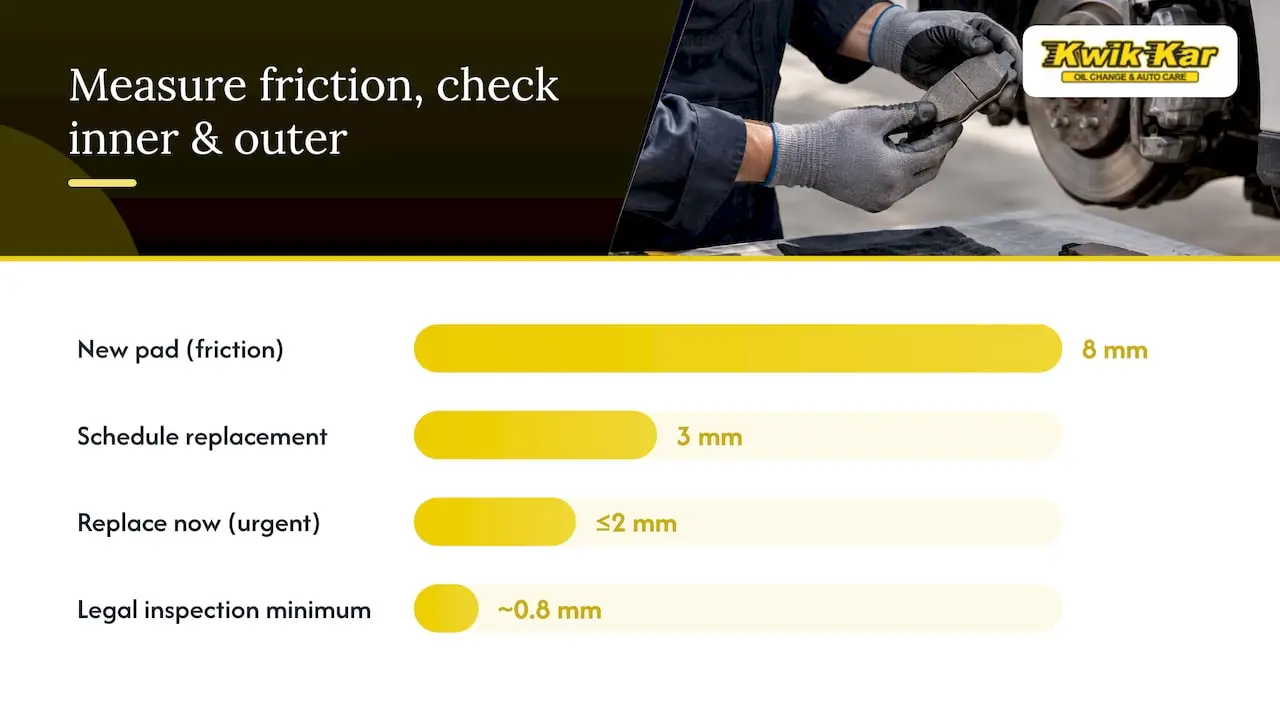
Here is the simplest way to translate a measurement into a decision. AAA recommends replacing pads once they drop below 1/8 inch, about 3.2 millimeters, and notes that front pads typically last a variable number of miles depending on driving habits and conditions, generally lasting from a few tens of thousands to several tens of thousands of miles. Some practical guides frame 3 millimeters as the point to schedule service and 2 millimeters or less as urgent, especially once symptoms show up.
| Thickness | Inches | What it means |
|---|---|---|
| 8 mm | 5/16 in | New or lightly worn pad, no action needed |
| 3 mm | ~1/8 in | Plan replacement soon |
| 2 mm or less | 2 mm or less | Replace now, treat as urgent |
| ~0.8 mm | 1/32 in | Legal inspection minimum, not a safe driving target |
Replacing pads at 3 millimeters rather than waiting for the legal 1/32 inch minimum gives you a real safety margin before metal-on-metal contact starts damaging your rotors.
Two measurement details matter here. First, always measure the friction material itself, not the metal backing plate it’s bonded to. The backing plate adds thickness that has nothing to do with stopping power, so including it in your measurement makes a dangerously thin pad look acceptable. Second, inner and outer pads on the same wheel often wear at different rates, so a reading from one side doesn’t tell you about the other.
Treat the 1/32 inch figure as a legal line, not a maintenance plan. Waiting until you’re at the regulatory minimum means you have no buffer left if a measurement is slightly off, or if the next few hundred miles include hard stops in traffic. Replacing at 3 millimeters costs you nothing in safety and saves you from a last-minute scramble.
How to measure brake pad thickness accurately at home
Checking your own pads takes about fifteen minutes per wheel and tells you more than a visual glance ever will. Here’s a reliable process:
- Park on level ground, engage the parking brake, and loosen the lug nuts slightly before jacking up the car.
- Remove the wheel to get a clear, direct view of the caliper and pads rather than squinting through the spokes.
- Locate the inner and outer pads pressed against either side of the rotor.
- Use a small ruler, a brake pad thickness gauge, or digital calipers to measure the friction material only, at its thinnest visible point.
- Check both the inner and outer pad, since uneven wear between them is common and a single reading can miss a problem.
- Record both numbers and compare them against the thresholds above before reassembling the wheel.
A small inspection light or your phone’s flashlight makes a real difference here, since calipers and rotors often shadow the thinnest section of the pad. If you don’t want to pull the wheel, you can sometimes see the outer pad through the wheel spokes with a flashlight, but this only shows one side and can miss a badly worn inner pad, which is a common blind spot according to AAA’s inspection guidance.
The most common mistakes are measuring the metal backing plate instead of the friction material, mistaking a wear indicator groove for remaining pad thickness, and only checking the pad you can see without removing the wheel. Any of these can make a dangerously worn pad look fine.
Pro Tip: If your two readings differ by more than a couple of millimeters, or you’re not confident in what you’re seeing, stop measuring and bring the car in. A shop can check caliper function and rotor condition at the same time, which a flashlight and ruler can’t tell you.
Symptoms that mean your brakes need attention now
Numbers matter, but your car is usually telling you something before you ever get a tape measure out. Watch for these signs:
- Grinding noise when braking, which usually means the friction material is gone and the backing plate is contacting the rotor directly.
- A soft, sinking, or spongy pedal that requires more travel than usual to slow the car.
- Vibration or pulsing through the pedal or steering wheel, often pointing to a warped or damaged rotor.
- The car pulling to one side during braking, which can signal uneven pad wear or a sticking caliper.
- A persistent squeal, which is frequently a built-in wear indicator doing exactly what it’s designed to do.
- A brake warning light on the dashboard, which should never be ignored regardless of how the car feels.
Grinding is the one symptom that changes the plan entirely. Once you hear it, you likely have metal on metal, and continued driving risks damaging the rotor surface, extending stopping distances, and in worst cases, losing effective braking force at the worst possible moment. If you hear grinding, reduce your speed, avoid hard stops, and get the vehicle to a shop immediately rather than continuing your normal driving routine. For more on these warning signs and what they usually mean, a closer look at each symptom can help you decide how urgent your situation really is.
Why rotor condition changes the replacement decision
Pads and rotors wear together, and replacing one without checking the other is how a simple brake job turns into a repeat visit. Every rotor has a minimum thickness specification, often stamped directly on the rotor itself, and a rotor machined or worn below that number needs replacement rather than resurfacing. Scoring, deep grooves, or a blue discoloration from overheating are all signs the rotor surface is no longer providing consistent, even contact with the pad.
A thorough check includes several steps beyond just measuring the pad:
- A micrometer reading on rotor thickness, compared against the minimum spec stamped on the rotor or listed by the manufacturer.
- A caliper slide and function check, since a caliper that doesn’t move freely causes uneven pad wear even with brand-new pads installed.
- A look for fluid or grease contamination on the pad surface, which reduces braking performance even when thickness looks fine.
- Verification that new pads are properly bonded to their backing plates before installation.
This is also where the case for pad-only repairs falls apart if the rotor is already below spec or warped. New pads riding against a damaged rotor wear unevenly from day one and can reintroduce the same vibration or pulling you started with. If a rotor is within its machinable range and the damage is minor, resurfacing can be a reasonable option, but a rotor near or below minimum thickness needs replacement alongside the pads. For a closer look at checking rotor condition yourself, our guide to inspecting brake rotors walks through what to look for.
When to bring your brakes to a professional
A flashlight and a ruler can tell you a lot, but a full brake inspection catches things a driveway check can’t. When we inspect a vehicle’s brakes, the process typically includes:
- Measuring inner and outer pad thickness on every wheel, not just the side visible through the spokes.
- Checking rotor thickness against the minimum spec with a micrometer.
- Testing caliper slide pins and hardware for smooth, even movement.
- Looking for fluid, grease, or brake dust contamination on the pad and rotor surfaces.
- A test drive to confirm pedal feel, braking response, and the absence of pulling or vibration.
Our technicians work with manufacturer specifications on every brake job, and that combination is what keeps a repair from becoming a repeat visit. Before your appointment, it helps to note any symptoms you’ve noticed, such as noise, pulling, or pedal feel, and roughly when they started. If you’ve already measured your pads yourself, bring that number with you.
Pro Tip: Ask the shop to show you the rotor’s micrometer reading and your pad thickness in millimeters, and ask directly whether hardware or brake fluid service is needed. A straight answer to both questions tells you a lot about the thoroughness of the inspection.
If you’d rather see a full walkthrough of a pad replacement first, our DIY brake pad replacement guide covers the process in more depth.
Our take: measure first, then let symptoms make the call
The regulatory minimum of 1/32 inch gets cited constantly, but treating it as a target instead of a legal floor is where a lot of drivers get into trouble. That number exists for inspectors doing a pass or fail check, not for someone deciding how long to keep driving on a given set of pads. The more useful habit is measuring at 3 millimeters, well before the legal cutoff, and letting that reading start the conversation rather than end it.
What gets underweighted in most advice is the inner pad. Drivers check what they can see through the wheel, assume the other side matches, and miss the uneven wear that causes most surprise grinding noises. If you only remember one thing from this article, let it be this: a number without a symptom check is incomplete, and a symptom like grinding or a soft pedal should move you to immediate action regardless of what your last measurement said.
— Kwik Kar
Book a brake inspection at Kwik Kar White Settlement
If you measured 3 millimeters or less, or you’ve noticed grinding, pulling, or a soft pedal, the fastest path forward is a real inspection rather than another round of guessing. We handle a full range of brake work in one visit, helping you avoid bouncing between shops for a second opinion.

What we check and offer during a brake visit:
- Brake Pad & Rotor Replacement, measured and matched to manufacturer specifications rather than guesswork.
- Full brake inspection, including pad thickness, rotor condition, and caliper function.
- Engine Diagnostic services when a dashboard warning light accompanies your brake concerns.
When you call or book online, mention any symptoms you’ve noticed and your own measurement if you have one. You can schedule directly through our brake repair and service page, and if cost is a factor, our brake service coupons are worth checking before your visit.
FAQ
Is 4 mm brake pad thickness okay to drive on?
Yes, 4 millimeters is above the common replacement threshold of around 3 millimeters, or 1/8 inch, so it’s generally fine for continued driving. It’s still worth planning a replacement in the coming months rather than waiting until the pad drops further.
Can I keep driving with 2 mm brake pads?
Two millimeters is at the point most guidance treats as urgent, close to the legal inspection minimum of about 1/32 inch over the fastener. We recommend scheduling replacement immediately rather than continuing to drive on pads this thin, especially if you notice any grinding or reduced braking feel.
Is 3 mm an acceptable brake pad thickness?
Three millimeters, roughly 1/8 inch, is the point where AAA recommends replacement rather than waiting further. It still has some life left, but it’s the right time to schedule service rather than monitor and wait.
Is 7 mm of brake pad material still good?
Yes, a measurement well above replacement thresholds indicates a pad with substantial life remaining. Routine monitoring at your next oil change or inspection is sufficient at this thickness.
How do I know if it’s my pads or my rotors causing a problem?
Grinding, reduced pedal feel, and thin measurements usually point to pads, while vibration, pulsing, or scoring on the rotor surface point to rotor issues. Since pads and rotors wear together, a full inspection that measures both is the only reliable way to know which component needs attention.
Sources
- eCFR :: 49 CFR Part 570 Subpart A – Vehicles With GVWR of 10,000 Pounds or Less
- Signs That Your Brake Pads Need Attention | AAA Club Alliance
- PART 570—VEHICLE IN USE INSPECTION STANDARDS